Posts tonen met het label Daring bakers. Alle posts tonen

zondag 27 mei 2012

Daring bakers may 2012: Challah


May’s Daring Bakers’ Challenge was pretty twisted – Ruth from The Crafts of Mommyhood challenged us to make challah! Using recipes from all over, and tips from “A Taste of Challah,” by Tamar Ansh, she encouraged us to bake beautifully braided breads.

Baking bread isn't a think i have done verry often and certainly not from scratch. So i was a little bit intriqued by this challenge when i started it. To start with baking bread from "scratch" i thought it was a good idea to use the easy challah recipe provided by Ruth.

The making of the challah "after all" wasn't dificult at all but it took some time because of all the time it needs to rise. I was braiding the bread in a three strain(you can also do four or six strain) and that part went verry smooth either. So i wondered ,why was i so afraid my attempt would fail? This bread looks so nice but mine turned out great as well.

The taste of the bread was  surprisingly nice, the sweet flavor of it and the slight yellow color. You can also make a lot of variations on this bread. Some of the daring bakers put nutella or fruit inside, i'd like to try that to anytime soon. The only thing is that in mine opinion you have to eat this bread the same day it is baked because it thurns dry quickly. But with the leftovers i made a great challah bread pudding, i'll tell you everything about that tommorow.

What to do with Chalalh leftovers make an Vanilla and cinnamon Challah bread pudding!
Here are the recipes that ruth provided for the chalange:


Ruth’s “Go-To” Whole Wheat Challah
(adapted from D’s Whole Wheat Challah)
Servings: 12

Ingredients
2 (.25 oz.) packages (4½ teaspoons) (22½ ml) (15 gm) (½ oz) dry yeast
1 cup (240 ml) warm water (100°F/38°C)
½ cup (120 ml) (100 gm) (3½ oz) brown sugar, firmly packed
½ cup (one stick) (120 ml) (115 gm/4 oz) margarine or unsalted butter – room temperature
2 tsp. (10 ml) (15 gm) (½ oz) salt
3 large eggs
2 cups (480 ml) (280 gm/10 oz) whole wheat flour
2 cups (480 ml) (280 gm/10 oz) all-purpose flour
½ cup (120 ml) (50 gm) (1¾ oz) rolled oats (Old Fashioned work just fine!)
Additional flour for kneading (½ to 1 cup) (120 to 240 ml) (70 to 140 gm) (2½ to 5 oz)
1 egg beaten with 1 tsp. water for glaze

Directions:
1. In the bowl of your stand mixer, dissolve yeast in warm water. Allow to stand about 5 minutes until creamy/foamy.
2. With paddle attachment beat 3 eggs, sugar, margarine (or butter), whole wheat flour, all purpose flour and oats into the yeast mixture. Or, if mixing by hand (ok, spoon), combine eggs and margarine/butter with yeast mixture until well mixed. Add flours and oats and mix until it becomes difficult to mix.
3. Once combined, switch to the dough hook and knead for 5 to 10 minutes until smooth and elastic, adding flour as/if needed. If kneading by hand, this should take about 10-12 minutes.
4. Form dough into a round, compact ball. Turn in oiled bowl, cover with a kitchen/tea towel. Let rise in warm area (I put it in the oven with the light on) until doubled, approx. 2 hours.
5. Once dough has doubled, punch down. Recover with towel, allow to rise again for an hour, but even 30 minutes will be fine if you’re in a hurry.
6. Punch the dough down again, divide in two.
7. Shape each half as desired (3, 4 or 6 strand braid, rolls, etc.). Place shaped loaves onto parchment covered baking trays. Cover with the towel and allow to rise another hour.
8. Preheat oven to 350 degrees.
9. Brush loaves with egg wash. (Sprinkle with vanilla sugar/sesame seeds/poppy seeds/other topping here if desired)
10. Bake 30 to 40 min. until the loaf sounds hollow when tapped on the bottom.
11. Transfer loaves to a wire rack to cool before serving.

Challah (Honey White)

(from Tammy’s Recipes)
Servings: 2 loaves

Ingredients
1 ½ cups (360 ml) warm water, separated
1 Tbsp. (15 ml) (15 gm/½ oz sugar
2 Tbsp. (2-2/3 packets) (30 ml) (18 gm) (2/3 oz) dry active yeast
½ cup (120 ml) honey
1 Tbsp. (15 ml) oil (light colored vegetable oil, or olive oil if you prefer)
4 large eggs
1 ½ tsp. 7½ ml) (9 gm) (1/3 oz) salt
5 cups (1200 ml) (700 gm/25 oz) all-purpose (plain) flour, plus more as needed (up to 8 or 9 cups total)
1 egg beaten with 1 tsp. water

Directions:
1. In mixer bowl/large mixing bowl combine ½ cup warm water, 1 Tbsp. sugar and 2 Tbsp. yeast. Allow to proof approximately 5 minutes until foamy.
2. To the yeast mixture add the remaining water, honey, oil, eggs, salt and 5 cups of flour. Knead (by hand or with your mixer’s dough hook) until smooth, adding flour as needed. Knead for approximately 10 minutes.
3. Transfer dough to a clean, oiled bowl, turn to coat or add a bit more oil on top. Cover bowl with a kitchen/tea towel. Leave to rise in a warm place until doubled, about 1 ½ hours.
4. Punch down the dough, divide it into two sections. Use one half to make each loaf (shaped or braided as desired).
5. Place loaves on parchment lined or greased baking sheets, cover with a towel, allow to rise 30 minutes.
6. Preheat oven to 325 degrees.
7. Brush tops loaves with egg wash. (Sprinkle with seeds or toppings here if wanted.)
8. Bake loaves 30-40 minutes until done.
9. Cool on wire racks.


Easy Challah

(from templedavid.org)

Ingredients
4 cups (960 ml) (360 gm/20 oz) all-purpose (plain) flour
1 cup (240 ml) warm water
1 package (2¼ teaspoons) (11¼ ml) (7 gm) (¼ oz) package rapid rise yeast
½ (120 ml) (115 gm/4 oz) cup sugar
2 large eggs
1 tsp. (5 ml) (6 gm) salt
1 egg beaten with 1 tsp. water

Directions:
1. Measure flour, sugar and salt into a large mixing bowl.
2. In a separate bowl (or in the bowl of your stand mixer) combine water and yeast, allow to sit 5 minutes until foamy.
3. Add 1 ½ cups of the flour mixture to the water and yeast mixture, beat until well combined. Cover with a dish towel, let stand 30 min.
4. Add two eggs to the dough, beat again.
5. By hand or with your dough hook knead in the remaining flour mixture. Knead approximately 10 minutes.
6. Transfer to oiled bowl, cover, let rise one hour.
7. Punch down dough, knead approximately 3 minutes.
8. Divide dough in two. Shape each half as desired (3, 4, or 6 strand braid).
9. Place loaves on parchment covered or greased cookie sheets, cover with a towel, allow to rise one hour.
10. Preheat oven to 400 degrees.
11. Brush loaves with egg wash.
12. Bake at 400 degrees for 10 minutes. Reduce oven temperature to 375 degrees, bake until golden crust forms (about 25-30 minutes).
13. Transfer to a wire rack to cool.


Storage & Freezing Instructions/Tips:
Once cooled, challah loaves which will not be eaten right away (or in the next couple of days) should be bagged in heavy duty freezer bags. Remove excess air from the bag before securing it tightly (tying a knot or using tape). Put the bagged loaf/loaves into the freezer as soon as possible to ensure fresh taste; frozen challah will keep approximately three months.


Additional Information:
Egg free recipes: This recipe uses baking powder for the egg-replacer. The resulting loaves were light and fluffy, and tasted better than I thought they would!
http://www.vegkitchen.com/recipes/special-occasions-and-entertaining/jew...
This recipe uses a more common egg replacer – flax seed meal. It was a tougher dough than I was used to using, but the resulting loaves were light, and looked beautiful with the flax speckles.
http://thatsonetoughcookie.com/2009/06/22/olive-oil-flax-seed-vegan-chal...
Gluten free recipes:
 http://www.epicurious.com/recipes/member/views/GLUTEN-FREE-CHALLAH-PAREV...
http://celiacdisease.about.com/gi/o.htm?zi=1/XJ&zTi=1&sdn=celiacdisease&...
Videos: These videos were made in my kitchen. The kids – mine and my sister’s were running around. So it is totally a real world view, no fancy tricks happening!
Video of basic three strand braid:
http://s1075.photobucket.com/albums/w440/tinkrsh/challah%20braiding/?act...
Videos of four strand braids:
http://s1075.photobucket.com/albums/w440/tinkrsh/challah%20braiding/?act...
Videos of six strand braids:
http://s1075.photobucket.com/albums/w440/tinkrsh/challah%20braiding/?act...
Video of four strand braided round:
http://s1075.photobucket.com/albums/w440/tinkrsh/challah%20braiding/?act...
Additional resources:
http://en.wikipedia.org/wiki/Challah
http://www.thechallahblog.com
http://www.atasteofchallah.com/

donderdag 30 juni 2011

Daring bakers june 2011: Baklava and making our own phyllo!


Erica of Erica’s Edibles was our host for the Daring Baker’s June challenge. Erica challenged us to be truly DARING by making homemade phyllo dough and then to use that homemade dough to make Baklava.

This Challenge took me more then 4(minus all the resting time) hours to make, but the outcome was more then word it. Well it started out as fun and easy just mixxing the dough by hand(don't have a stand mixer:( yet). After kneadding for 20 minutes like the recipe calls for i was glad i had a little break, because the dough had to rest.
Then it was time for the not so fun part "the rolling of the dough". I just had a normal rolling pin, and i started watching the video Erica had provided. If you see that you think that everything is going to be fine, but now i think differently about it. I spended a lot of time of time rolling the dough, and when i was reday and had all the phyllo sheets to assemble the baklava in my pan. They where stuck together, i didn't used enough flour inbetween i prsume. So started over rolling again...

Finally my baklava was ready for the oven, and it statred smelling real good. But ofcourse whe couldn't take a bite because whe had to wait another 24 hour to soak in the syrup. It was deffinatly worth the wait. This baklava is Delicious! Thank you Erica for this Dare to bake/make something out of my kitchen comfort zone.

Preparation time: The recipe may seem simple but it is a little time consuming

Phyllo Dough Mixing/Kneading: 15-25 minutes
Resting time: 30-90 minutes (longer is better)
Rolling Phyllo: varies, approx. 2 minutes per sheet

Syrup: 15 minutes plus cooling
Baklava: 30 minutes
Resting: Overnight

Equipment required:

Measuring spoons
Wooden dowel or rolling pin
Sharp knife
Measuring cups
Towels
Spatula
Stand mixer (can knead by hand)
Baking dishes – 9” x 9” is recommended
Strainer
Plastic wrap
Medium pot
Pastry brush
Food processor /blender
Bowls

Phyllo Dough:

*Note 1: To have enough to fill my 9” x 9” baking dish with 18 layers of phyllo I doubled this recipe.
*Note 2: Single recipe will fill a 8” x 5” baking dish.
*Note 3: Dough can be made a head of time and froze. Just remove from freezer and allow to thaw
and continue making your baklava

Ingredients:
1 1/3 cups (320 ml) (185 gm/6½ oz) unbleached all purpose (plain) flour
1/8 teaspoon (2/3 ml) (¾ gm) salt
1/2 cup less 1 tablespoon (105 ml) water, plus more if needed
2 tablespoons (30 ml) vegetable oil, plus additional for coating the dough
1/2 teaspoon (2½ ml) cider vinegar, (could substitute white wine vinegar or red wine vinegar, but could affect the taste)

Directions:

1. In the bowl of your stand mixer combine flour and salt
2. Mix with paddle attachment
3. Combine water, oil and vinegar in a small bowl.
4. Add water & oil mixture with mixer on low speed, mix until you get a soft dough, if it appears dry add a little more water (I had to add a tablespoon more)
5. Change to the dough hook and let knead approximately 10 minutes. You will end up with beautiful smooth dough. If you are kneading by hand, knead approx. 20 minutes.
6. Remove the dough from mixer and continue to knead for 2 more minutes. Pick up the dough and through it down hard on the counter a few times during the kneading process.
7. Shape the dough into a ball and lightly cover with oil
8. Wrap tightly in plastic wrap and let rest 30-90 minutes, longer is best ( I let mine rest 2 hours and it was perfect)


Rolling your Phyllo

** Remove all rings and jewelry so it does not snag the dough**

Use whatever means you have to get the dough as thin as you can. I have included a fantastic video at the end of the post on how to roll out your phyllo dough, using a wooden dowel, which worked perfectly for me. You may also use a pasta machine if you have one, or a normal rolling pin whatever works for you.

1.Unwrap your dough and cut off a chunk slightly larger then a golf ball. While you are rolling be sure to keep the other dough covered so it doesn’t dry out.
2. Be sure to flour your hands, rolling pin and counter. As you roll you will need to keep adding, don’t worry, you can’t over-flour.
3. Roll out the dough a bit to flatten it out.
4. Wrap the dough around your rolling pin/dowel
5. Roll back and forth quickly with the dough remaining on the dowel (see attached video for a visual, its much easier then it sounds)
6. Remove; notice how much bigger it is!
7. Rotate and repeat until it is as thin as you can it. Don’t worry if you get rips in the dough, as long as you have one perfect one for the top you will never notice.
8. When you get it as thin as you can with the rolling pin, carefully pick it up with well floured hands and stretch it on the backs of your hands as you would a pizza dough, just helps make it that much thinner. Roll out your dough until it is transparent. NOTE: you will not get it as thin as the frozen phyllo dough you purchase at the store, it is made by machine
9.Set aside on a well-floured surface. Repeat the process until your dough is used up. Between each sheet again flower well. You will not need to cover your dough with a wet cloth, as you do with boxed dough, it is moist enough that it will not try out.


After i poured in the syrup.

Baklava Recipe

Adapted from Alton Brown, The Food Network
30 servings

Ingredients

For the syrup:
·1 1/4 cups (300 ml) honey
·1 1/4 cups (300ml) water
·1 1/4 cups (300 ml) (280 gm/10 oz) sugar
·1 cinnamon stick
·1 (2-inch/50 mm) piece fresh citrus peel (lemon or orange work best)
·a few cloves or a pinch or ground clove

When you put your baklava in the oven start making your syrup. When you combine the two, one of them needs to be hot, I find it better when the baklava is hot and the syrup has cooled

Directions

1. Combine all ingredients in a medium pot over medium high heat. Stir occasionally until sugar has dissolved
2. Boil for 10 minutes, stir occasionally.
3. Once boiled for 10 minutes remove from heat and strain cinnamon stick and lemon, allow to cool as baklava cooks


Ingredients for the Filling:

1 (5-inch/125 mm piece) cinnamon stick, broken into 2 to 3 pieces or 2 teaspoons (10 ml) (8 gm) ground cinnamon
15 to 20 whole allspice berries ( I just used a few pinches)
3/4 cup (180 ml) (170 gm/6 oz) blanched almonds
3/4 cup (180 ml) (155 gm/5½ oz) raw or roasted walnuts
3/4 cup (180 ml) (140 gm/5 oz) raw or roasted pistachios
2/3 cup (160 ml) (150 gm/ 5 1/3 oz) sugar
phyllo dough (see recipe above)
1 cup (2 sticks) (240 ml) (225g/8 oz) melted butter ** I did not need this much, less then half**

Directions:

1.Preheat oven to moderate 350°F/180°C/gas mark 4.
2.Combine nuts, sugar and spices in a food processor and pulse on high until finely chopped. If you do not have a food processor chop with a sharp knife as fine as you can. Set aside
3. Trim your phyllo sheets to fit in your pan
4. Brush bottom of pan with butter and place first phyllo sheet
5. Brush the first phyllo sheet with butter and repeat approximately 5 times ending with butter. (Most recipes say more, but homemade phyllo is thicker so it's not needed)
6. Sprinkle 1/3 of the nut mixture on top
7. Continue layering phyllo and buttering repeating 4 times
8. Sprinkle 1/3 of the nut mixture on top
9. Continue layering phyllo and buttering repeating 4 times
10. Sprinkle 1/3 of the nut mixture on top
11. Continue layering and buttering phyllo 5 more times. On the top layer, make sure you have a piece of phyllo with no holes if possible, just looks better.
12. Once you have applied the top layer tuck in all the edges to give a nice appearance.
13. With a Sharp knife cut your baklava in desired shapes and number of pieces. If you can't cut all the ways through don’t worry you will cut again later. A 9x9 pan cuts nicely into 30 pieces. Then brush with a generous layer of butter making sure to cover every area and edge
14. Bake for approximately 30 minutes; remove from oven and cut again this time all the way through. Continue baking for another 30 minutes. (Oven temperatures will vary, you are looking for the top to be a golden brown, take close watch yours may need more or less time in the oven)
15. When baklava is cooked remove from oven and pour the cooled (will still be warmish) syrup evenly over the top, taking care to cover all surfaces when pouring. It looks like it is a lot but over night the syrup will soak into the baklava creating a beautifully sweet and wonderfully textured baklava!
Next morning all syrup is absorbed
16. Allow to cool to room temperature. Once cooled cover and store at room temperature. Allow the baklava to sit overnight to absorb the syrup.
17. Serve at room temperature


After 24 hours when all the syrup schould have been absorbed.

Freezing/Storage Instructions/Tips: There are a few ways to store your Baklava. It is recommended that you store your baklava at room temperature in an airtight container. Stored at room temperature your baklava will last for up to 2 weeks. You will notice as the days pass it will get a little juicier and chewier. You may choose to store it in the fridge; this will make it a little harder and chewy, but does increase the shelf life. You can also freeze your baklava and then just set it out at room temperature to thaw.


Additional Information: I have included some videos and links to help you through the process

How to roll the phyllo dough -
http://www.youtube.com/watch?v=vvNzAi9w6TU&feature=related

Excellent 3 part video showing the whole process -
http://www.youtube.com/watch?v=MLV7W-KUME8&feature=related
http://www.youtube.com/watch?v=z8pzyKgxuF4&feature=related
http://www.youtube.com/watch?v=aJgotI69pXY&feature=related

Making Hollow Baklava Rolls- http://www.youtube.com/watch?v=6FvM8cWzjKI

Making Baklava Rolls - http://www.youtube.com/watch?v=H51egHWv0sQ

Nut Free Baklava –
http://hubpages.com/hub/nut-free-baklava-recipe
http://tzk-design.com/recipe/nut-free-baklava

Gluten Free Baklava
http://glutenfreepastry.org/gluten-free-baklava-recipe-demonstration/
http://gluten-free.mobi/gluten-free-baklava.php

zondag 28 november 2010

Daring bakers november 2010: Crostata!


The 2010 November Daring Bakers’ challenge was hosted by Simona of briciole. She chose to challenge Daring Bakers’ to make pasta frolla for a crostata. She used her own experience as a source, as well as information from Pellegrino Artusi’s Science in the Kitchen and the Art of Eating Well.


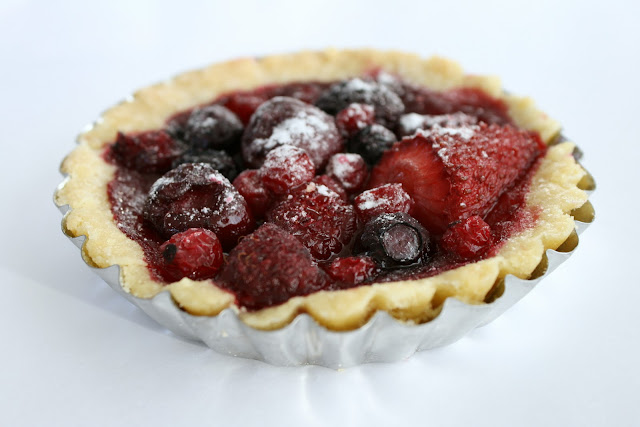
To make mine i used the first pasta frolla recipe and had it refrigerated over 1 night. The dough was a bit crumbly starting out filling my little tart pans, but it all ended well.
Made three different kind of crostata, first some with strawberry preserves, the second with frozen red fruit and the last one with fresh apple. I baked the apple a bit and mixed it up with sugar and cinnamon.
25 minutes of baking wasn't long enough for this little crostata, the ones with the fruit needed 10 minutes of additional time.

The crostata really taste delicious! Simona thank you for this great challenge!


These are the recipe's we had to use:

Version 1 of pasta frolla
Ingredients:

•1/2 c. minus 1 tablespoon [105 ml, 100 g, 3 ½ oz] superfine sugar (see Note 1) or a scant 3/4 cup [180ml, 90g, 3 oz] of powdered sugar
•1 and 3/4 cup [420 ml, 235 g, 8 1/4 oz.] unbleached all-purpose flour
•a pinch of salt
•1 stick [8 tablespoons / 4 oz. / 115 g] cold unsalted butter, cut into small pieces
•grated zest of half a lemon (you could also use vanilla sugar as an option, see Note 2)
•1 large egg and 1 large egg yolk, lightly beaten in a small bowl
Note 1: Superfine sugar is often also referred to as ultrafine, baker’s sugar or caster sugar. It’s available in most supermarkets. If you cannot find “superfine” sugar, you can make your own by putting some regular granulated sugar in a food processor or blender and letting it run until the sugar is finely ground.

Note 2: There are different ways of making vanilla sugar. I keep vanilla beans in a jar half-filled with sugar until I need to use them, for example, to make vanilla ice cream. After I remove the split bean from the custard that will go into the ice cream maker, I rinse it, dry it and put it back in the jar with sugar.

Making pasta frolla by hand:

1.Whisk together sugar, flour and salt in a bowl.
2.Rub or cut the butter into the flour until the mixture has the consistency of coarse crumbs. You can do this in the bowl or on your work surface, using your fingertips or an implement of choice.
3.Make a well in the center of the mounded flour and butter mixture and pour the beaten eggs into it (reserve about a teaspoon of the egg mixture for glazing purposes later on – place in the refrigerator, covered, until ready to use).
4.Add the lemon zest to your flour/butter/egg mixture.
5.Use a fork to incorporate the liquid into the solid ingredients, and then use your fingertips.
6.Knead lightly just until the dough comes together into a ball.
7.Shape the dough into a flat disk and wrap in plastic wrap. Place the dough in the refrigerator and chill for at least two hours. You can refrigerate the dough overnight.

Making pasta frolla with a food processor:


1.Put sugar, flour, salt, and lemon zest in the food processor and pulse a few times to mix.
2.Add butter and pulse a few times, until the mixture has the consistency of coarse meal.
3.Empty food processor's bowl onto your work surface
4.See step 3 above and continue as explained in the following steps (minus the lemon zest, which you have already added).
Variation for Version 1 of pasta frolla:

If you want, you can make the pasta frolla using a combination of all-purpose flour and whole-wheat pastry flour.

If you choose to try this variation, use 1 cup [240 ml, 135 g, 4 3/4 oz.] unbleached all-purpose flour and 3/4 cup [180 ml, 100 g, 3.5 oz.] whole-wheat pastry flour.

Version 2 of pasta frolla

In this version of pasta frolla, I have played with different kinds of flours, using almond, whole-grain barley and, most recently, coconut flour instead of some of the all-purpose flour. If you want to try a different version of pasta frolla that uses some flours that you wouldn’t normally use, this is a good recipe to try. All the flours listed below (whole-wheat pastry, almond flour, coconut flour and barley flour) are available at health food stores. You may even find them at well-stocked supermarkets.

The preparation for this version of pasta frolla is very similar to the preparation for Version 1.

Ingredients

•1/3 cup [80 ml, 75 g, 2 2/3 oz.] superfine sugar or 1/2 cup [120ml, 60 g, 2 oz]powdered sugar (see Note 1.)
•1/2 cup [120 ml, 65 g, 2 3/8 oz.] unbleached all-purpose flour
•1/2 cup [120ml, 65 g. 2 1/4 oz.] whole-wheat pastry flour
•1/4 cup [60ml, 28 g, 1 oz] almond flour, or almond meal, or coconut flour
•1/4 cup [60ml, 28 g, 1 oz.] whole-grain barley flour or unbleached all-purpose flour
•a pinch of salt
•6 tablespoons[90ml, 85 g, 3 oz] cold unsalted butter, cut into small pieces
•1 large egg, lightly beaten
•1/4 teaspoon vanilla extract (you can also use vanilla sugar; see Note 2.)
Note 1: Superfine sugar is often also referred to as ultrafine, baker’s sugar or caster sugar. It’s available in most supermarkets. If you cannot find “superfine” sugar, you can make your own by putting some regular granulated sugar in a food processor or blender and letting it run until the sugar is finely ground.

Note 2: There are different ways of making vanilla sugar. I keep vanilla beans in a jar half-filled with sugar until I need to use them, for example, to make vanilla ice cream. After I remove the split bean from the custard that will go into the ice cream maker, I rinse it, dry it and put it back in the jar with sugar.

Directions:

By hand:

1.Whisk together sugar, flours and salt in a bowl.
2.Rub or cut the butter into the sugar and flour mixture until it has the consistency of coarse crumbs. You can do this in the bowl or on your work surface, using your fingertips or an implement of choice.
3.Make a well in the center of the flour and butter mixture and pour the beaten egg and vanilla extract into it.
4.Use a fork to incorporate the liquid into mixture and then use your fingertips.
5.Knead lightly just until the dough comes together into a ball.
6.Shape the dough into a flat disk and wrap in plastic wrap. Place the dough in the refrigerator and chill for at least two hours. You can refrigerate the dough overnight.
With a food processor:

1.Put sugar, flour, and salt in the bowl of the food processor and pulse a few times to mix.
2.Add butter and pulse a few times until the mixture has the consistency of coarse meal.
3.Empty food processor's bowl onto your work surface.
4.Make a well in the center of the mounded flour and butter mixture and pour the beaten egg and vanilla extract into it.
5.Use a fork to incorporate the liquid into the solid ingredients then use your fingertips.
6.Knead lightly just until the dough comes together into a ball.
7.Shape the dough into a flat disk and wrap in plastic wrap. Place the dough in the refrigerator and chill for at least two hours. You can refrigerate the dough overnight.


Ideas for Filling for Your Crostata
Whether you choose to make Version 1 or 2 of the pasta frolla, there are numerous fillings that you can choose from for your crostata. I am suggesting some filling for you here (and including assemblage and baking instructions). But be brave and creative and see what you can come up with!

Crostata di Marmellata (crostata with a jam filling using Version 1 pasta frolla)

If you choose to make a crostata with a jam filling, you will need:

•1 and 3/4 cups [415ml, 600 gm, 21 oz] of jam or fruit preserves, whatever flavor you like (Note: I use my homemade fruit preserves, which have a low sugar content. I recommend you choose a good quality product, made with mostly fruit.)
Assembling and baking the crostata di marmellata:

1.Heat the oven to 375ºF [190ºC/gas mark 5].
2.Take the pasta frolla out of the fridge, unwrap it and cut away ¼ of the dough. Reserve this dough to make the lattice top of the crostata. Refrigerate this dough while you work on the tart base.
3.To help roll the crostata dough, keep the dough on top of the plastic wrap that you had it wrapped in. This can help rolling the dough and can also help when transferring the dough to your pan. You can also use parchment paper for this. However, you can also roll the dough directly on a work surface if you prefer.
4.Lightly dust the top of the dough and your work surface (if you’re rolling directly on a work surface) with flour. Keep some flour handy to dust the dough as you go along.
5.If the dough is very firm, start by pressing the dough with the rolling pin from the middle to each end, moving the rolling pin by a pin's width each time; turn the dough 180 degrees and repeat; when it softens, start rolling.
6.Roll the dough into a circle about 1/8th inch (3 mm) thick.
7.If you used the plastic wrap or parchment paper as rolling surface, flip dough over the pan, centering it, and delicately press it all around so the corners are well covered. Peel away the plastic wrap.
8.Trim the excess dough hanging over the edges of the pan. Press the remaining dough around the border into the sides of the pan making sure the border is an even thickness all the way around.
9.Prick the bottom of the dough with a fork in several places.
10.Take out of the fridge the reserved pasta frolla you had cut away earlier. Roll it with your pin and cut into strips or use cookie cutters to make small shapes (this is not traditional, but it looks cute); or roll with your hands into ropes.
11.Spread the jam or fruit preserves evenly over the bottom of the crostata.
12.Use the prepared strips or rolls of dough to make a lattice over the surface, or decorate with the cut shapes. (Note: You can use dough scraps to make cookies: see the Additional Information section for some pointers)
13.Brush the border and strips of dough with the reserved beaten eggs. You can add a drop or two of water to the beaten eggs if you don’t have enough liquid.
14.Put the tart in the oven and bake for 25 minutes.
15.After 25 minutes, check the tart and continue baking until the tart is of a nice golden hue. (Note: Every oven is different. In my oven it took 34 minutes to bake the tart until golden.)
16.When done, remove the tart from the oven and let cool. If you have used a tart pan with a removable bottom, then release the tart base from the fluted tart ring. Make sure the tart is completely cool before slicing and serving.


donderdag 27 mei 2010

Daring Bakers May 2010: Piece Montée


When i saw this month's challenge i really was impressed, did they really think we could make something like in the picture(Down here), gladly we didn't had to make such a large french honeymoon cake. Piece Montée(or Croquembouche) is traditonal French dessert made out of cream puffs assembled in a conical shape, and served at weddings or baptisms. I chose to make the vanilla creme patissiere en drip it with chocolate, it was easier then it looked, and the taste was scrumptious! Cat thanks for introducing is to such a great dessert!


The May 2010 Daring Bakers’ challenge was hosted by Cat of Little Miss Cupcake. Cat challenged everyone to make a piece montée, or croquembouche, based on recipes from Peter Kump’s Baking School in Manhattan and Nick Malgieri.

Preparation time: You will want to use your puff pastry batter and chocolate glaze or caramel as soon as it has been prepared and as close to serving time as possible. This is not a dessert that stores well and it may be a bit temperamental in humid areas as the glaze needs to harden to hold the choux together. The crème patissiere can be made a couple of days in advance and stored in the fridge until ready to use.

You will need approximately 10 minutes to prepare the puff pastry, 10 minutes to pipe and about 30 minutes to bake each batch. The crème patissiere should take about 10 minutes to cook and then will need to be cooled for at least 6 hours or overnight. The glazes take about 10 minutes to prepare.

Equipment required:
• several baking sheets
• parchment paper
• a whisk
• a pastry brush (for the egg wash)
• a pastry bag and tip (a plain tip or no tip is best for piping the puff pastry; you can use a plain or star tip to fill the puff pastry with the cream)
• a flat surface such as a baking sheet or cake board/stand on which to assemble your piece montée
• some of the items you may want to use to decorate your piece montée include ribbons, Jordan almonds, fresh flowers, sugar cookie cut-outs, chocolates, etc.

Ingredients:

For the Vanilla Crème Patissiere (Half Batch)
1 cup (225 ml.) whole milk
2 Tbsp. cornstarch
6 Tbsp. (100 g.) sugar
1 large egg
2 large egg yolks
2 Tbsp. (30 g.) unsalted butter
1 Tsp. Vanilla

Dissolve cornstarch in ¼ cup of milk. Combine the remaining milk with the sugar in a saucepan; bring to boil; remove from heat.

Beat the whole egg, then the yolks into the cornstarch mixture. Pour 1/3 of boiling milk into the egg mixture, whisking constantly so that the eggs do not begin to cook.

Return the remaining milk to boil. Pour in the hot egg mixture in a stream, continuing whisking.

Continue whisking (this is important – you do not want the eggs to solidify/cook) until the cream thickens and comes to a boil. Remove from heat and beat in the butter and vanilla.


Pour cream into a stainless steel/ceramic bowl. Press plastic wrap firmly against the surface. Chill immediately and until ready to use.

For Chocolate Pastry Cream (Half Batch Recipe):
Bring ¼ cup (about 50 cl.) milk to a boil in a small pan; remove from heat and add in 3 ounces (about 80 g.) semisweet chocolate, finely chopped, and mix until smooth. Whisk into pastry cream when you add the butter and vanilla.

For Coffee Pastry Cream (Half Batch recipe)
Dissolve 1 ½ teaspoons instant espresso powder in 1 ½ teaspoons boiling water. Whisk into pastry cream with butter and vanilla.

Pate a Choux (Yield: About 28)
¾ cup (175 ml.) water
6 Tbsp. (85 g.) unsalted butter
¼ Tsp. salt
1 Tbsp. sugar
1 cup (125 g.) all-purpose flour
4 large eggs

For Egg Wash: 1 egg and pinch of salt

Pre-heat oven to 425◦F/220◦C degrees. Line two baking sheets with parchment paper.

Preparing batter:
Combine water, butter, salt and sugar in a saucepan over medium heat. Bring to a boil and stir occasionally. At boil, remove from heat and sift in the flour, stirring to combine completely.

Return to heat and cook, stirring constantly until the batter dries slightly and begins to pull away from the sides of the pan.

Transfer to a bowl and stir with a wooden spoon 1 minute to cool slightly.
Add 1 egg. The batter will appear loose and shiny.
As you stir, the batter will become dry-looking like lightly buttered mashed potatoes.

It is at this point that you will add in the next egg. Repeat until you have incorporated all the eggs.

Piping:
Transfer batter to a pastry bag fitted with a large open tip (I piped directly from the bag opening without a tip). Pipe choux about 1 inch-part in the baking sheets. Choux should be about 1 inch high about 1 inch wide.

Using a clean finger dipped in hot water, gently press down on any tips that have formed on the top of choux when piping. You want them to retain their ball shape, but be smoothly curved on top.

Brush tops with egg wash (1 egg lightly beaten with pinch of salt).

Baking:
Bake the choux at 425◦F/220◦C degrees until well-puffed and turning lightly golden in color, about 10 minutes.

Lower the temperature to 350◦F/180◦C degrees and continue baking until well-colored and dry, about 20 minutes more. Remove to a rack and cool.


Can be stored in a airtight box overnight.

Filling:
When you are ready to assemble your piece montée, using a plain pastry tip, pierce the bottom of each choux. Fill the choux with pastry cream using either the same tip or a star tip, and place on a paper-lined sheet. Choux can be refrigerated briefly at this point while you make your glaze.

Use one of these to top your choux and assemble your piece montée.

Chocolate Glaze:
8 ounces/200 g. finely chopped chocolate (use the finest quality you can afford as the taste will be quite pronounced; I recommend semi-sweet)

Melt chocolate in microwave or double boiler. Stir at regular intervals to avoid burning. Use the best quality chocolate you can afford. Use immediately.

Hard Caramel Glaze:
1 cup (225 g.) sugar
½ teaspoon lemon juice

Combine sugar and lemon juice in a saucepan with a metal kitchen spoon stirring until the sugar resembles wet sand. Place on medium heat; heat without stirring until sugar starts to melt around the sides of the pan and the center begins to smoke. Begin to stir sugar. Continue heating, stirring occasionally until the sugar is a clear, amber color. Remove from heat immediately; place bottom of pan in ice water to stop the cooking. Use immediately.

Assembly of your Piece Montée:
You may want to lay out your unfilled, unglazed choux in a practice design to get a feel for how to assemble the final dessert. For example, if making a conical shape, trace a circle (no bigger than 8 inches) on a piece of parchment to use as a pattern. Then take some of the larger choux and assemble them in the circle for the bottom layer. Practice seeing which pieces fit together best.

Once you are ready to assemble your piece montée, dip the top of each choux in your glaze (careful it may be still hot!), and start assembling on your cake board/plate/sheet. Continue dipping and adding choux in levels using the glaze to hold them together as you build up. (You may want to use toothpicks to hold them in place)

dinsdag 27 april 2010

Daring Bakers April 2010: traditional British pudding


The April 2010 Daring Bakers’ challenge was hosted by Esther of The Lilac Kitchen. She challenged everyone to make a traditional British pudding using, if possible, a very traditional British ingredient: suet.

Due to the volcanic ash cloud hanging over Europe i could participate in this months challenge. Because our vacation is postponed, i had enough time to make a pudding. But unfortuned it was a sunday... so all the shops where closed. So i really had to go find a pudding recipe with ingredients i still had. Because i don't have suet lying around the house, it became a sponge cake with butter. I found a recipe on puddingclub.com for Banana & Cinnamon Pudding. I still had left one banana at home, so even had to half the recipe...

The recipe was verry easy to make, but i don't have a pudding form. But i had a little iron bowl with a rather large edge on it, so i could use aluminum foil to cover the pudding. Steamed it in my largest cooking pan, with a ramequin at the bottom so the bowl would not touch the bottom. After 1 hour of cooking it was ready. It came out perfectly and it smelled delicous! I served it with some custard(pre fab:( i didn't had the ingredients to make a custard myself). It was a scrumptious! I wil definatly try to make a pudding again. After my holiday going to try a chocolate pudding. Thanks Esther for introducing this traditional English food to us.


Banana & Cinnamon Pudding(from http://www.puddingclub.com/wikipudia/banana-cinnamon-pudding)
Bananas give a good texture and flavour to a spiced sponge mixture.

Ingredients
120g Margarine
120g Sugar
1 large Egg, beaten
1 tablespoon Milk
120g Self Raising Flour
½ Teaspoon Baking Powder
1 ½ level teaspoons Powdered Cinnamon
2 Bananas, peeled
2 teaspoons Lemon Juice

Method
Cream the margarine and sugar together, then beat in the egg and milk. Sift the flour, baking powder and cinnamon together. Mash the banana with the lemon juice, then stir into the creamed mixture and fold in the flour. Spoon the mixture into a greased 900ml pudding basin. Cover securely and steam for 1 hour. Turn out and serve with Custard.


Preparation time: Preparation time is 5 to 20 minutes depending on the filling. Cooking time is 1 to 5 hours so do this on a day you have jobs around the house to do or are popping in and out as you need to occasionally check the pan hasn’t boiled dry! However it is otherwise a very low time requirement dish.

Equipment required:
• 2 pint (1 litre) pudding bowl or steam-able containers to contain a similar amount they should be higher rather than wide and low
Traditional pudding bowl so you know what is normally used.

• Steamer or large pan, ideally with a steaming stand, upturned plate or crumpled up piece of kitchen foil
• Mixing bowl
• Spoon
• Measuring cups or scales
• Foil or grease proof paper to cover the bowl
• String

Type 1 Puddings — suet crusts.

Pudding Crust for both Savoury Pudding or Sweet Pudding (using suet or a suet substitute):


Ingredients

(250 grams/12 ounces) Self-raising flour (Note* If you cannot find self-raising flour, use a combination of all-purpose flour and baking powder.)
(175 grams/6 ounces) Shredded suet or suet substitute (i.e., Vegetable Suet, Crisco, Lard)
(a pinch) Salt and pepper (Note* If making a savory dish, can be replaced with spices for sweet if wished.)
(210 millilitres/a little less than a cup) Water (Note* You can use a milk or a water and milk mix for a richer pastry.)

1. Mix the flour and suet together.
2. Season the flour and suet mixture with salt and pepper if savory and just a bit of salt and/or spices if sweet.
3. Add the water, a tablespoonful at a time, as you mix the ingredients together. Make up the pastry to firm an elastic dough that leaves the bowl clean. The liquid amounts are only an estimate and most recipes just say water to mix.

4. Don’t over handle the pastry or it will be too hard.
5. Reserve a quarter for the lid and roll out the rest and line a well-greased bowl.
6. At this point add your filling.. a couple of options are give below but have fun and go wild!
7. Roll the final piece of pastry out into a circle big enough to cover the top of the basin, dampen the edges and put in position on the pudding, pinching the edges together to seal.
8. Seal well and cover with a double sheet of foil – pleated in the centre to allow room for expansion while cooking. Secure with string, and place it in a steamer over boiling water.
9. Steam for up to 5 hours, you may need to add more boiling water halfway through or possibly more often. There is a lot of leeway in this steaming time and different recipes give different steaming times. Delia Smith says 5 hours for Steak and kidney where as Mrs Beeton says 2.5 for a similar dish! One way to tell that it is cooked is when the pastry changes colour and goes from white to a sort of light golden brown. It is also hard to over steam a pudding so you can leave it bubbling away until you are ready.


This one is a steak and onion one cooked for 1.5 hours.

This sort of pastry can also be used as a topping for a baked meat pie and becomes quite a light crusty pastry when baked.

Savoury Pudding Filling options: steak and kidney pudding.


1 full amount of suet crust (see recipe above)
(450 grams/about 1 pound) Chuck steak
(225 grams/about 1/2 a pound) Ox kidney
1 medium-sized onion
2 teaspoons well-seasoned flour
splash of Worcestershire sauce

1. Chop the steak and kidney into fairly small cubes, toss them in seasoned flour, then add them to the pastry lined basin.
2. Pop the onion slices in here and there.
3. Add enough cold water to reach almost to the top of the meat and sprinkle in a few drops of Worcestershire sauce and season with salt and pepper.
4. Follow the rest of the instructions in the crust recipe to finish pudding.
5. Cook for at least 2.5 hours (Mrs Beeton) up to 5 hours (Delia Smith).


Sweet Pudding Options: Sussex Pond Pudding

1 amount of suet pastry (see recipe above)
(120 grams/4.2 ounces) Demerara Sugar
(120 grams/4.2 ounces) unsalted butter
1 large lemon

1. Cut the butter into small pieces and put half in the basin with half the sugar.
2. Prick the whole lemon (preferably one with a thin skin) all over, using a thick skewer.
3. Place on top of the butter and sugar in the basin.
4. Cover with the rest of the butter and sugar.
5. Finish building the pudding as per the pastry recipe.
6. Steam for 3 ½ hours, or longer (for a really tender lemon), adding more water if needed.
7. To serve, turn the pudding into a dish with a deep rim, when you slice into it the rich lemon sauce will gush out.
8. Make sure each person is served some of the suet crust, lemon and tangy luscious sauce.

Type 2 puddings – Steamed Suet Pudding, sponge type.

(100 grams/4 ounces) All-purpose flour
(1/4 teaspoon) salt
(1.5 teaspoons) Baking powder
(100 grams/4 ounces) breadcrumbs
(75 grams/3 ounces) Caster sugar
(75 grams/ 3 ounces) Shredded suet or suet substitute (i.e., Vegetable Suet, Crisco, Lard)
(1) large egg
(6 to 8 tablespoons) Cold milk

1. Sift flour, salt and baking powder into bowl.
2. Add breadcrumbs, sugar and suet.
3. Mix to a soft batter with beaten egg and milk
4. Turn into a buttered 1 litre/ 2pint pudding basin and cover securely with buttered greaseproof paper or aluminum foil.
5. Steam steadily for 2.5 to 3 hours
6. Turn out onto warm plate, Serve with sweet sauce to taste such as custard, caramel or a sweetened fruit sauce.

Variants:
Spotted Dick - Add 75g/ 3oz currants and 25g/1 oz of mixed chopped peel with the sugar.
Syrup or Treacle or Marmalade Pudding – put 2 Tablespoons of golden syrup, treacle or marmalade at the bottom of the bowl before adding pudding mix.
My Fair Lady Pudding – Add finely grated rind of 1 medium orange or lemon with the sugar.
Ginger Pudding – replace the sugar with 100g/4oz of treacle, and add 1/2 tsp ground ginger.


zaterdag 27 maart 2010

Daring bakers march 2010: Orange tian


The 2010 March Daring Baker’s challenge was hosted by Jennifer of Chocolate Shavings. She chose Orange Tian as the challenge for this month, a dessert based on a recipe from Alain Ducasse’s Cooking School in Paris.

I was very exited about this dessert to make, and i had never heard of it before. So i started out with getting al the ingredients. But could'nt find any pectin so had to make my marmalade without it. Used a little bit of gelatin, and that worked out fine. Hated the biterness of marmalade, so i found out i really don't like it.

Cutting the orange segments and making the pate sablé disc where no problem at al just like making the orange caramel. But making the stabiled whipped cream i accidentally used to much gelatin, and it turned out lumpy. Gladly i had enough whipped cream to try it out again. They turned out great and made some with marmelade and some with caramel fudge sauce(instead of marmelade).
Will be making it again but without the marmalade, thats for sure.


For the Marmalade:

Ingredients
U.S. Imperial Metric Instructions for IngredientsFreshly pressed orange juice ¼ cup + 3 tablespoons; 3.5 oz; 100 grams1 large orange used to make orange slicescold water to cook the orange slicespectin 5 gramsgranulated sugar: use the same weight as the weight of orange slices once they are cooked
Finely slice the orange. Place the orange slices in a medium-sized pot filled with cold water. Simmer for about 10 minutes, discard the water, re-fill with cold water and blanch the oranges for another 10 minutes.
Blanch the orange slices 3 times. This process removes the bitterness from the orange peel, so it is essential to use a new batch of cold water every time when you blanch the slices.
Once blanched 3 times, drain the slices and let them cool.
Once they are cool enough to handle, finely mince them (using a knife or a food processor).
Weigh the slices and use the same amount of granulated sugar . If you don’t have a scale, you can place the slices in a cup measurer and use the same amount of sugar.
In a pot over medium heat, add the minced orange slices, the sugar you just weighed, the orange juice and the pectin. Cook until the mixture reaches a jam consistency (10-15 minutes).
Transfer to a bowl, cover with plastic wrap and put in the fridge.
For the Pate Sablee:

Ingredients
U.S. Imperial Metric Instructions for Ingredients2 medium-sized egg yolks at room temperaturegranulated sugar 6 tablespoons + 1 teaspoon; 2.8 oz; 80 gramsvanilla extract ½ teaspoonUnsalted butter ¼ cup + 3 tablespoons; 3.5 oz; 100 grams ice cold, cubedSalt 1/3 teaspoon; 2 gramsAll-purpose flour 1.5 cup + 2 tablespoons; 7 oz; 200 gramsbaking powder 1 teaspoon ; 4 grams
Directions:Put the flour, baking powder, ice cold cubed butter and salt in a food processor fitted with a steel blade.
In a separate bowl, add the eggs yolks, vanilla extract and sugar and beat with a whisk until the mixture is pale. Pour the egg mixture in the food processor.
Process until the dough just comes together. If you find that the dough is still a little too crumbly to come together, add a couple drops of water and process again to form a homogenous ball of dough. Form into a disc, cover with plastic wrap and leave to rest in the fridge for 30 minutes.Preheat your oven to 350 degree Fahrenheit.
Roll out the dough onto a lightly floured surface until you obtain a ¼ inch thick circle.
Using your cookie cutter, cut out circles of dough and place on a parchment (or silicone) lined baking sheet. Bake for 20 minutes or until the circles of dough are just golden.


For the Orange Segments:

For this step you will need 8 oranges.
Cut the oranges into segments over a shallow bowl and make sure to keep the juice. Add the segments to the bowl with the juice.

For the Caramel:

Ingredients U.S. Metric Imperial Instructions for Ingredientsgranulated sugar 1 cup; 7 oz; 200 gramsorange juice 1.5 cups + 2 tablespoons; 14 oz; 400 grams
Place the sugar in a pan on medium heat and begin heating it.
Once the sugar starts to bubble and foam, slowly add the orange juice. As soon as the mixture starts boiling, remove from the heat and pour half of the mixture over the orange segments.
Reserve the other half of the caramel mixture in a small bowl — you will use this later to spoon over the finished dessert. When the dessert is assembled and setting in the freezer, heat the kept caramel sauce in a small saucepan over low heat until it thickens and just coats the back of a spoon (about 10 minutes). You can then spoon it over the orange tians.
[Tip: Be very careful when making the caramel — if you have never made caramel before, I would suggest making this step while you don’t have to worry about anything else. Bubbling sugar is extremely, extremely hot, so make sure you have a bowl of ice cold water in the kitchen in case anyone gets burnt!]


For the Whipped Cream:

Ingredients
U.S. Metric Imperial Instructions for Ingredientsheavy whipping cream 1 cup; 7 oz; 200 grams3 tablespoons of hot water1 tsp Gelatine1 tablespoon of confectioner's sugarorange marmalade (see recipe above) 1 tablespoon
In a small bowl, add the gelatine and hot water, stirring well until the gelatine dissolves. Let the gelatine cool to room temperature while you make the whipped cream. Combine the cream in a chilled mixing bowl. Whip the cream using a hand mixer on low speed until the cream starts to thicken for about one minute. Add the confectioner sugar. Increase the speed to medium-high. Whip the cream until the beaters leave visible (but not lasting) trails in the cream, then add the cooled gelatine slowly while beating continuously. Continue whipping until the cream is light and fluffy and forms soft peaks. Transfer the whipped cream to a bowl and fold in the orange marmalade.[Tip: Use an ice cold bowl to make the whipped cream in. You can do this by putting your mixing bowl, cream and beater in the fridge for 20 minutes prior to whipping the cream.]


Assembling the Dessert:
Make sure you have some room in your freezer. Ideally, you should be able to fit a small baking sheet or tray of desserts to set in the freezer.
Line a small tray or baking sheet with parchment paper or a silicone sheet. Lay out 6 cookie cutters onto the parchment paper/silicone.
Drain the orange segments on a kitchen towel.
Have the marmalade, whipped cream and baked circles of dough ready to use.
Arrange the orange segments at the bottom of each cookie cutter. Make sure the segments all touch either and that there are no gaps. Make sure they fit snuggly and look pretty as they will end up being the top of the dessert. Arrange them as you would sliced apples when making an apple tart.
Once you have neatly arranged one layer of orange segments at the bottom of each cookie cutter, add a couple spoonfuls of whipped cream and gently spread it so that it fills the cookie cutter in an even layer. Leave about 1/4 inch at the top so there is room for dough circle.
Using a butter knife or small spoon, spread a small even layer of orange marmalade on each circle of dough.
Carefully place a circle of dough over each ring (the side of dough covered in marmalade should be the side touching the whipping cream). Gently press on the circle of dough to make sure the dessert is compact.
Place the desserts to set in the freezer to set for 10 minutes.
Using a small knife, gently go around the edges of the cookie cutter to make sure the dessert will be easy to unmold. Gently place your serving plate on top of a dessert (on top of the circle of dough) and turn the plate over. Gently remove the cookie cutter, add a spoonful of caramel sauce and serve immediately.