Posts tonen met het label Apple. Alle posts tonen

maandag 28 mei 2012

Vanilla and Cinnamon Challah bread pudding


Yesterday was the day that the daring bakers presented this months challenge, whe made challah this time. I made 2 small loaves but whe couldn't eat all of it with the two of us and it was already starting to get dry. So i decided to make a bread pudding from the leftovers of this delicious sweet bread.
Here is the recipe

Do you want to make Challah bread yourself here is the recipe.

Vanilla and Cinnamon Challah bread pudding

Adapted from here.
serving 5 to 7

Ingredients:

5 cups challah bread, in cubes
1 cup whole milk
½ cup whipping cream
3 eggs, lightly beaten
½ cup granulated sugar
¼ cup unsalted butter, melted and cooled
1 cup apple, peeled and chopped
½ cup of nuts, chopped
¼ cup of raisins
1 teaspoon vanilla extract
½ teaspoon ground cinnamon
1 teaspoon baking powder
a pinch of salt
Icing sugar and cinnamon for decoration

Directions:

Preheat oven to 350 degrees F (180 degrees C) and  lightly grease a 8 X 8 inch square baking dish.

Place the bread chunks in a large mixing bowl.

In another bowl, mix together the whole milk, whipping cream, eggs, sugar, butter, vanilla, cinnamon, baking powder and salt, then pour this mixture over the bread chunks & let stand for 10 minutes.

Fold in the apples and nuts,  then spoon the mixture into the prepared pan and dust the top with a little powdered sugar and cinnamon.

Bake 30-40 minutes, or until lightly golden.

Cool about 5 minutes before serving, although it will also taste just fine served cold.


woensdag 16 maart 2011

Apple and Thyme Martini


The exact origin of the Martini is unclear however the most likely explanation is that it was simply a shortening of the main ingredient, Martini branded vermouth. One popular alternative suggests it evolved from a cocktail called the Martinez served at the Occidental Hotel in San Francisco in 1862, which people frequented before taking an evening ferry to the nearby town of Martinez. Another theory links the origin of the Martini to the name of a bartender who concocted the drink at the Knickerbocker Hotel in New York City in 1911.

The original Martinez cocktail consisted of two ounces of Italian Martini & Rossi sweet vermouth, one ounce Old Tom sweet gin, two dashes maraschino liquor, one dash bitters, shaken, and served with a twist of lemon.By the end of the 19th century, the martini had morphed into a simpler form: two dashes of Orange bitters, mixed with half a jigger of dry French vermouth and half a jigger of dry English gin, stirred and served with an olive.

But it was Prohibition and the relative ease of illegal gin manufacture that led to the martini's rise as the predominant cocktail of the mid 20th century. With the repeal of Prohibition, and the ready availability of quality gin, the drink became progressively dryer. In the 1970s and 80s, the martini came to be seen as old-fashioned and was replaced by more intricate cocktails and wine spritzers, but the mid-1990s saw a resurgence in the drink and an explosion of new versions.

Some of the newer versions (e.g., appletini, peach martini, chocolate martini), take their name not from the ingredients, but from the cocktail glass they share with the martini.

If you have read al that information you will see in giada's recipe there is only vodka. So it's a very modern take on Martini with even a pinch of thyme, this is where the homemade thyme syrup that i posted earlier this week comes in.
After taking my first sip of it , i almost spit it out because the vodka was to strong for me. I had to ad some more apple juice to make it drinkable. Then the taste was fine i liked the Thyme in it but my boyfriend(from now i will reference to him with Mr. R)totaly didn't. I would chance the amount of vodka and applejuice to use in this recipe with each other the next time.

Recipe can be found here
Courtesy of Giada de Laurentiis


serves: 4
Ingredients
Ice
10 ounces vodka
6 ounces apple juice
1/4 cup thyme syrup, recipe posted earlier on my site
1 large apple, peeled
4 fresh thyme sprigs

Directions
Special equipment: melon baller

Chill the martini glasses.

Fill the shaker with ice. Combine the vodka, apple juice, and thyme syrup in a martini shaker. Shake for about 10 seconds. Divide between the 4 chilled martini glasses.

Use the melon baller to scoop out small balls of apple. Place 3 balls of apple and 1 sprig of thyme in each glass for garnish. Serve immediately.


Reference:
http://en.wikipedia.org/wiki/Martini_(cocktail)

maandag 14 maart 2011

Dutch apple pie for my blogs 1st anniversery!


The dutch don't let any (Birthday)anniversery go by without a piece of there homemade apple pie. So here is my version of this classic, for my blogs first anniversery!

Dutch apple pie (appeltaart or appelgebak) recipes are distinct in that they typically call for flavourings such as cinnamon and lemon juice to be added. Dutch apple pies are usually decorated in a lattice style. Dutch apple pies may include ingredients such as raisins and icing, in addition to ingredients such as apples and sugar, which they have in common with other recipes.

Recipes for Dutch apple pie go back centuries. There exists a painting from the Dutch Golden Age, dated 1626, featuring such a pie.

The basis of Dutch apple pie is a crust on the bottom and around the edges. This is then filled with pieces or slices of apple, usually a crisp and mildly tart variety such as Goudreinet or Elstar. Cinnamon and sugar are generally mixed in with the apple filling. The filling can be sprinkled with liqueur for taste although this is very uncommon. Atop the filling, strands of dough cover the pie in a lattice, holding the filling in place but keeping it visible. Though it can be eaten cold, warmed is more common, with a dash of whipped cream or vanilla ice cream. In the Netherlands it is usually eaten cold, sometimes with whipped cream on top.


Ingredients:
Servings: 8-12

for the dough:
2 1/8 cups self-rising flour (300g)
3/4 cup butter (180g) or 3/4 cup margarine (180g)
1/2 cup brown sugar (150g)
1 teaspoon vanilla essence or 1 (8 g) packet vanilla sugar
1 pinch salt
1 egg

for the filling:
2 1/4 lbs apples(1kg)(i used Goudreinet but you can use any firm and a little sour apple you like)
3/4 cup raisins (washed and dried, 100g)
1/4 cup granulated sugar (40g)
3 teaspoons cinnamon (or more to taste)
2 1/2 teaspoons lemon juice (or more to taste)
3 tablespoon semolina(to absorb the juices)(or 2 tablespoons of corn starch)

Directions:
Prep Time: 2 hrs and 70 minutes baking time

For the dough:
Sieve the flour, brown sugar, vanilla and the salt into a bowl.
Cut the butter or margarine into small cubes and add these to the flour mixture.
Beat the egg and add 3/4 of it to the flour mixture (you will need the rest for the top).
Using two knives, mix the butter/margarine and the flour mixture or use your kitchen machine(i don't have one so did it by hand).
Using one hand, kneed it to form the dough - you should be able to form it into a ball (this may take a while).
Put the ball of dough in the fridge for about an hour, in the meantime, make the
filling.

For the filling:
Peel the apples and cut them in cubes.
In a (large) bowl, combine apple, raisins, sugar, cinnamon, the lemon juice and half of the semolina(or all the corn starch)
Mix well and allow the flavors to blend, stirring occasionally.

Making the actual pie:
Butter a 9-inch round springform cake pan, or spray it with a non-stick spray.
Line the pan (bottom and sides) with about 3/4 of the dough - as long as the pan is covered, the layer need not be very thick.
Cover the bottom with the remaining semolina.
Add the filling, but try to leave the juices out.
On a lightly floured surface, roll out the remaining dough until it's less than 1/4 inch (1/2 cm) thick.
Cut the dough into strips and layer them over the apple pie to form a raster, covering no more than one third of the surface--you should be able to see quite a bit of the apple pieces (see picture).
If necessary, use (some of) the remaining dough to make the edges a bit higher.
Use the remaining egg to coat the dough strips.
Bake the pie at 175°C (340°F), just below the middle of your oven, for about 65-75 minutes.
If you have any dough left, roll it out, sprinkle with sugar and cinnamon (or left-over apple mixture) and bake it on baking paper for a few minutes.
Remove the springform only *after* the pie has cooled.
Serve warm (reheat in oven or microwave) or cold, with whipped or ice cream

Tips:
- I don't bother to roll the dough out and cut it as it is pretty sticky and causes a mess. I simply wet my hands and shape it by hand, pressing the dough into the pie dish in a uniform thickness. As for the lattice-work, I shape them by hand into longish sausage shapes, which I press flat onto the pie. The pie will rise and hide a multitude of sins.
- Use any kind of nuts(about 80g) you like in the filling.
- Instead of 3 teaspoons of cinnamon use dutch speculaaskruiden or pumpkin spice mix in the same amount.
- Make a layer of almond paste on the pie bottom before you put the apple filling in.
- Soak the raisins in Rum or another liquer you like.


References:
-http://en.wikipedia.org/wiki/Apple_pie

zondag 28 november 2010

Daring bakers november 2010: Crostata!


The 2010 November Daring Bakers’ challenge was hosted by Simona of briciole. She chose to challenge Daring Bakers’ to make pasta frolla for a crostata. She used her own experience as a source, as well as information from Pellegrino Artusi’s Science in the Kitchen and the Art of Eating Well.


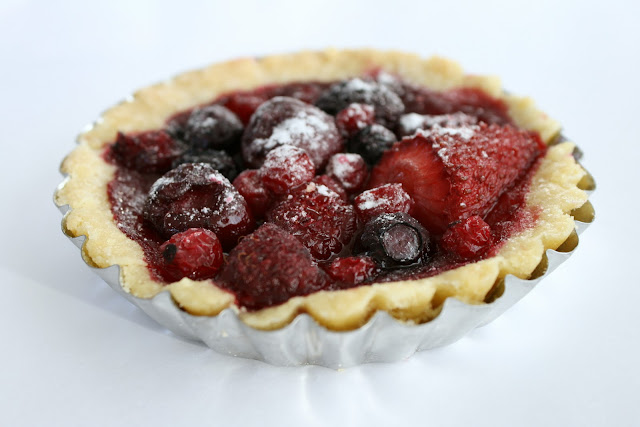
To make mine i used the first pasta frolla recipe and had it refrigerated over 1 night. The dough was a bit crumbly starting out filling my little tart pans, but it all ended well.
Made three different kind of crostata, first some with strawberry preserves, the second with frozen red fruit and the last one with fresh apple. I baked the apple a bit and mixed it up with sugar and cinnamon.
25 minutes of baking wasn't long enough for this little crostata, the ones with the fruit needed 10 minutes of additional time.

The crostata really taste delicious! Simona thank you for this great challenge!

These are the recipe's we had to use:

Version 1 of pasta frolla
Ingredients:

•1/2 c. minus 1 tablespoon [105 ml, 100 g, 3 ½ oz] superfine sugar (see Note 1) or a scant 3/4 cup [180ml, 90g, 3 oz] of powdered sugar
•1 and 3/4 cup [420 ml, 235 g, 8 1/4 oz.] unbleached all-purpose flour
•a pinch of salt
•1 stick [8 tablespoons / 4 oz. / 115 g] cold unsalted butter, cut into small pieces
•grated zest of half a lemon (you could also use vanilla sugar as an option, see Note 2)
•1 large egg and 1 large egg yolk, lightly beaten in a small bowl
Note 1: Superfine sugar is often also referred to as ultrafine, baker’s sugar or caster sugar. It’s available in most supermarkets. If you cannot find “superfine” sugar, you can make your own by putting some regular granulated sugar in a food processor or blender and letting it run until the sugar is finely ground.

Note 2: There are different ways of making vanilla sugar. I keep vanilla beans in a jar half-filled with sugar until I need to use them, for example, to make vanilla ice cream. After I remove the split bean from the custard that will go into the ice cream maker, I rinse it, dry it and put it back in the jar with sugar.

Making pasta frolla by hand:

1.Whisk together sugar, flour and salt in a bowl.
2.Rub or cut the butter into the flour until the mixture has the consistency of coarse crumbs. You can do this in the bowl or on your work surface, using your fingertips or an implement of choice.
3.Make a well in the center of the mounded flour and butter mixture and pour the beaten eggs into it (reserve about a teaspoon of the egg mixture for glazing purposes later on – place in the refrigerator, covered, until ready to use).
4.Add the lemon zest to your flour/butter/egg mixture.
5.Use a fork to incorporate the liquid into the solid ingredients, and then use your fingertips.
6.Knead lightly just until the dough comes together into a ball.
7.Shape the dough into a flat disk and wrap in plastic wrap. Place the dough in the refrigerator and chill for at least two hours. You can refrigerate the dough overnight.

Making pasta frolla with a food processor:


1.Put sugar, flour, salt, and lemon zest in the food processor and pulse a few times to mix.
2.Add butter and pulse a few times, until the mixture has the consistency of coarse meal.
3.Empty food processor's bowl onto your work surface
4.See step 3 above and continue as explained in the following steps (minus the lemon zest, which you have already added).
Variation for Version 1 of pasta frolla:

If you want, you can make the pasta frolla using a combination of all-purpose flour and whole-wheat pastry flour.

If you choose to try this variation, use 1 cup [240 ml, 135 g, 4 3/4 oz.] unbleached all-purpose flour and 3/4 cup [180 ml, 100 g, 3.5 oz.] whole-wheat pastry flour.

Version 2 of pasta frolla

In this version of pasta frolla, I have played with different kinds of flours, using almond, whole-grain barley and, most recently, coconut flour instead of some of the all-purpose flour. If you want to try a different version of pasta frolla that uses some flours that you wouldn’t normally use, this is a good recipe to try. All the flours listed below (whole-wheat pastry, almond flour, coconut flour and barley flour) are available at health food stores. You may even find them at well-stocked supermarkets.

The preparation for this version of pasta frolla is very similar to the preparation for Version 1.

Ingredients

•1/3 cup [80 ml, 75 g, 2 2/3 oz.] superfine sugar or 1/2 cup [120ml, 60 g, 2 oz]powdered sugar (see Note 1.)
•1/2 cup [120 ml, 65 g, 2 3/8 oz.] unbleached all-purpose flour
•1/2 cup [120ml, 65 g. 2 1/4 oz.] whole-wheat pastry flour
•1/4 cup [60ml, 28 g, 1 oz] almond flour, or almond meal, or coconut flour
•1/4 cup [60ml, 28 g, 1 oz.] whole-grain barley flour or unbleached all-purpose flour
•a pinch of salt
•6 tablespoons[90ml, 85 g, 3 oz] cold unsalted butter, cut into small pieces
•1 large egg, lightly beaten
•1/4 teaspoon vanilla extract (you can also use vanilla sugar; see Note 2.)
Note 1: Superfine sugar is often also referred to as ultrafine, baker’s sugar or caster sugar. It’s available in most supermarkets. If you cannot find “superfine” sugar, you can make your own by putting some regular granulated sugar in a food processor or blender and letting it run until the sugar is finely ground.

Note 2: There are different ways of making vanilla sugar. I keep vanilla beans in a jar half-filled with sugar until I need to use them, for example, to make vanilla ice cream. After I remove the split bean from the custard that will go into the ice cream maker, I rinse it, dry it and put it back in the jar with sugar.

Directions:

By hand:

1.Whisk together sugar, flours and salt in a bowl.
2.Rub or cut the butter into the sugar and flour mixture until it has the consistency of coarse crumbs. You can do this in the bowl or on your work surface, using your fingertips or an implement of choice.
3.Make a well in the center of the flour and butter mixture and pour the beaten egg and vanilla extract into it.
4.Use a fork to incorporate the liquid into mixture and then use your fingertips.
5.Knead lightly just until the dough comes together into a ball.
6.Shape the dough into a flat disk and wrap in plastic wrap. Place the dough in the refrigerator and chill for at least two hours. You can refrigerate the dough overnight.
With a food processor:

1.Put sugar, flour, and salt in the bowl of the food processor and pulse a few times to mix.
2.Add butter and pulse a few times until the mixture has the consistency of coarse meal.
3.Empty food processor's bowl onto your work surface.
4.Make a well in the center of the mounded flour and butter mixture and pour the beaten egg and vanilla extract into it.
5.Use a fork to incorporate the liquid into the solid ingredients then use your fingertips.
6.Knead lightly just until the dough comes together into a ball.
7.Shape the dough into a flat disk and wrap in plastic wrap. Place the dough in the refrigerator and chill for at least two hours. You can refrigerate the dough overnight.


Ideas for Filling for Your Crostata
Whether you choose to make Version 1 or 2 of the pasta frolla, there are numerous fillings that you can choose from for your crostata. I am suggesting some filling for you here (and including assemblage and baking instructions). But be brave and creative and see what you can come up with!

Crostata di Marmellata (crostata with a jam filling using Version 1 pasta frolla)

If you choose to make a crostata with a jam filling, you will need:

•1 and 3/4 cups [415ml, 600 gm, 21 oz] of jam or fruit preserves, whatever flavor you like (Note: I use my homemade fruit preserves, which have a low sugar content. I recommend you choose a good quality product, made with mostly fruit.)
Assembling and baking the crostata di marmellata:

1.Heat the oven to 375ºF [190ºC/gas mark 5].
2.Take the pasta frolla out of the fridge, unwrap it and cut away ¼ of the dough. Reserve this dough to make the lattice top of the crostata. Refrigerate this dough while you work on the tart base.
3.To help roll the crostata dough, keep the dough on top of the plastic wrap that you had it wrapped in. This can help rolling the dough and can also help when transferring the dough to your pan. You can also use parchment paper for this. However, you can also roll the dough directly on a work surface if you prefer.
4.Lightly dust the top of the dough and your work surface (if you’re rolling directly on a work surface) with flour. Keep some flour handy to dust the dough as you go along.
5.If the dough is very firm, start by pressing the dough with the rolling pin from the middle to each end, moving the rolling pin by a pin's width each time; turn the dough 180 degrees and repeat; when it softens, start rolling.
6.Roll the dough into a circle about 1/8th inch (3 mm) thick.
7.If you used the plastic wrap or parchment paper as rolling surface, flip dough over the pan, centering it, and delicately press it all around so the corners are well covered. Peel away the plastic wrap.
8.Trim the excess dough hanging over the edges of the pan. Press the remaining dough around the border into the sides of the pan making sure the border is an even thickness all the way around.
9.Prick the bottom of the dough with a fork in several places.
10.Take out of the fridge the reserved pasta frolla you had cut away earlier. Roll it with your pin and cut into strips or use cookie cutters to make small shapes (this is not traditional, but it looks cute); or roll with your hands into ropes.
11.Spread the jam or fruit preserves evenly over the bottom of the crostata.
12.Use the prepared strips or rolls of dough to make a lattice over the surface, or decorate with the cut shapes. (Note: You can use dough scraps to make cookies: see the Additional Information section for some pointers)
13.Brush the border and strips of dough with the reserved beaten eggs. You can add a drop or two of water to the beaten eggs if you don’t have enough liquid.
14.Put the tart in the oven and bake for 25 minutes.
15.After 25 minutes, check the tart and continue baking until the tart is of a nice golden hue. (Note: Every oven is different. In my oven it took 34 minutes to bake the tart until golden.)
16.When done, remove the tart from the oven and let cool. If you have used a tart pan with a removable bottom, then release the tart base from the fluted tart ring. Make sure the tart is completely cool before slicing and serving.


vrijdag 19 maart 2010

Dutch Potato, witlof and apple mash with pork


This Sunday Spring will finally kick in, whe have been waiting for better weather. Because whe had a verry cold winter whit lots of snow. Don't understand me wrong i really love snow and the Dutch foods for this period( "stampot" mashed potato with different kind of vegetable). But spring time brings other vegetable and fruits again. Soon whe whil be able to eat white asparagus and strawberry again, which i always buy from a farmer 10 minutes by bike from my home. Straight from the field...hhmm delicious, can't hardly wait.


But to say goodbye to winter i cooked the last winter "stampot", witlof/apple mash.


Ingredients ( 4 servings)

1 kg potato ( for masching)
750 g witlof
2 apples
100 ml milk
fresh parsley
2 tblspoons olive oil
3 tblspoons butter
Pork (any kind you like)


Peel, cut and wash the potatoes. Boil them in water with salt for 20-25 minutes until tender. Chop the parsley and clean the witlof, cut these in strips. Peel the apples en remove the core. Half the apple in dices, the other in slices.

Heat the oil in a wok pan, and stir-fry the witlof for 4 minutes. Meanwhile bake or grill the apple slices. Then i grilled the pork untill done.

Heat the milk, drain the potatoes and mash them together with the butter. Mix in the witlof, parsley and apples dices. Garnisch with the apple slices.
Serve immediately

"Eet smakelijk"
