The 2010 November Daring Bakers’ challenge was hosted by Simona of
briciole. She chose to challenge Daring Bakers’ to make pasta frolla for a crostata. She used her own experience as a source, as well as information from Pellegrino Artusi’s Science in the Kitchen and the Art of Eating Well.
To make mine i used the first pasta frolla recipe and had it refrigerated over 1 night. The dough was a bit crumbly starting out filling my little tart pans, but it all ended well.
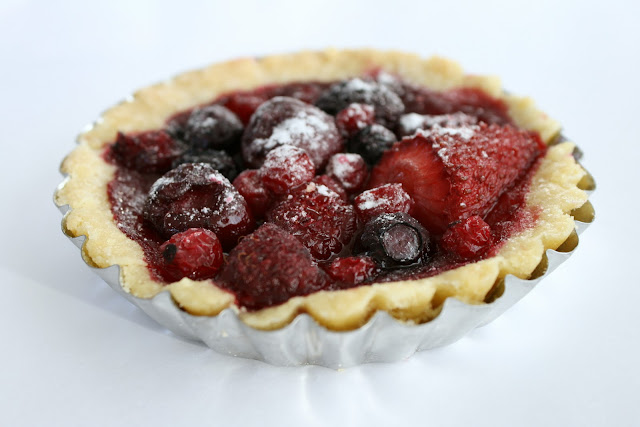
Made three different kind of crostata, first some with strawberry preserves, the second with frozen red fruit and the last one with fresh apple. I baked the apple a bit and mixed it up with sugar and cinnamon.
25 minutes of baking wasn't long enough for this little crostata, the ones with the fruit needed 10 minutes of additional time.
The crostata really taste delicious! Simona thank you for this great challenge!
These are the recipe's we had to use:
Version 1 of pasta frolla
Ingredients:
•1/2 c. minus 1 tablespoon [105 ml, 100 g, 3 ½ oz] superfine sugar (see Note 1) or a scant 3/4 cup [180ml, 90g, 3 oz] of powdered sugar
•1 and 3/4 cup [420 ml, 235 g, 8 1/4 oz.] unbleached all-purpose flour
•a pinch of salt
•1 stick [8 tablespoons / 4 oz. / 115 g] cold unsalted butter, cut into small pieces
•grated zest of half a lemon (you could also use vanilla sugar as an option, see Note 2)
•1 large egg and 1 large egg yolk, lightly beaten in a small bowl
Note 1: Superfine sugar is often also referred to as ultrafine, baker’s sugar or caster sugar. It’s available in most supermarkets. If you cannot find “superfine” sugar, you can make your own by putting some regular granulated sugar in a food processor or blender and letting it run until the sugar is finely ground.
Note 2: There are different ways of making vanilla sugar. I keep vanilla beans in a jar half-filled with sugar until I need to use them, for example, to make vanilla ice cream. After I remove the split bean from the custard that will go into the ice cream maker, I rinse it, dry it and put it back in the jar with sugar.
Making pasta frolla by hand:
1.Whisk together sugar, flour and salt in a bowl.
2.Rub or cut the butter into the flour until the mixture has the consistency of coarse crumbs. You can do this in the bowl or on your work surface, using your fingertips or an implement of choice.
3.Make a well in the center of the mounded flour and butter mixture and pour the beaten eggs into it (reserve about a teaspoon of the egg mixture for glazing purposes later on – place in the refrigerator, covered, until ready to use).
4.Add the lemon zest to your flour/butter/egg mixture.
5.Use a fork to incorporate the liquid into the solid ingredients, and then use your fingertips.
6.Knead lightly just until the dough comes together into a ball.
7.Shape the dough into a flat disk and wrap in plastic wrap. Place the dough in the refrigerator and chill for at least two hours. You can refrigerate the dough overnight.
Making pasta frolla with a food processor:
1.Put sugar, flour, salt, and lemon zest in the food processor and pulse a few times to mix.
2.Add butter and pulse a few times, until the mixture has the consistency of coarse meal.
3.Empty food processor's bowl onto your work surface
4.See step 3 above and continue as explained in the following steps (minus the lemon zest, which you have already added).
Variation for Version 1 of pasta frolla:
If you want, you can make the pasta frolla using a combination of all-purpose flour and whole-wheat pastry flour.
If you choose to try this variation, use 1 cup [240 ml, 135 g, 4 3/4 oz.] unbleached all-purpose flour and 3/4 cup [180 ml, 100 g, 3.5 oz.] whole-wheat pastry flour.
Version 2 of pasta frolla
In this version of pasta frolla, I have played with different kinds of flours, using almond, whole-grain barley and, most recently, coconut flour instead of some of the all-purpose flour. If you want to try a different version of pasta frolla that uses some flours that you wouldn’t normally use, this is a good recipe to try. All the flours listed below (whole-wheat pastry, almond flour, coconut flour and barley flour) are available at health food stores. You may even find them at well-stocked supermarkets.
The preparation for this version of pasta frolla is very similar to the preparation for Version 1.
Ingredients
•1/3 cup [80 ml, 75 g, 2 2/3 oz.] superfine sugar or 1/2 cup [120ml, 60 g, 2 oz]powdered sugar (see Note 1.)
•1/2 cup [120 ml, 65 g, 2 3/8 oz.] unbleached all-purpose flour
•1/2 cup [120ml, 65 g. 2 1/4 oz.] whole-wheat pastry flour
•1/4 cup [60ml, 28 g, 1 oz] almond flour, or almond meal, or coconut flour
•1/4 cup [60ml, 28 g, 1 oz.] whole-grain barley flour or unbleached all-purpose flour
•a pinch of salt
•6 tablespoons[90ml, 85 g, 3 oz] cold unsalted butter, cut into small pieces
•1 large egg, lightly beaten
•1/4 teaspoon vanilla extract (you can also use vanilla sugar; see Note 2.)
Note 1: Superfine sugar is often also referred to as ultrafine, baker’s sugar or caster sugar. It’s available in most supermarkets. If you cannot find “superfine” sugar, you can make your own by putting some regular granulated sugar in a food processor or blender and letting it run until the sugar is finely ground.
Note 2: There are different ways of making vanilla sugar. I keep vanilla beans in a jar half-filled with sugar until I need to use them, for example, to make vanilla ice cream. After I remove the split bean from the custard that will go into the ice cream maker, I rinse it, dry it and put it back in the jar with sugar.
Directions:
By hand:
1.Whisk together sugar, flours and salt in a bowl.
2.Rub or cut the butter into the sugar and flour mixture until it has the consistency of coarse crumbs. You can do this in the bowl or on your work surface, using your fingertips or an implement of choice.
3.Make a well in the center of the flour and butter mixture and pour the beaten egg and vanilla extract into it.
4.Use a fork to incorporate the liquid into mixture and then use your fingertips.
5.Knead lightly just until the dough comes together into a ball.
6.Shape the dough into a flat disk and wrap in plastic wrap. Place the dough in the refrigerator and chill for at least two hours. You can refrigerate the dough overnight.
With a food processor:
1.Put sugar, flour, and salt in the bowl of the food processor and pulse a few times to mix.
2.Add butter and pulse a few times until the mixture has the consistency of coarse meal.
3.Empty food processor's bowl onto your work surface.
4.Make a well in the center of the mounded flour and butter mixture and pour the beaten egg and vanilla extract into it.
5.Use a fork to incorporate the liquid into the solid ingredients then use your fingertips.
6.Knead lightly just until the dough comes together into a ball.
7.Shape the dough into a flat disk and wrap in plastic wrap. Place the dough in the refrigerator and chill for at least two hours. You can refrigerate the dough overnight.

Ideas for Filling for Your Crostata
Whether you choose to make Version 1 or 2 of the pasta frolla, there are numerous fillings that you can choose from for your crostata. I am suggesting some filling for you here (and including assemblage and baking instructions). But be brave and creative and see what you can come up with!
Crostata di Marmellata (crostata with a jam filling using Version 1 pasta frolla)
If you choose to make a crostata with a jam filling, you will need:
•1 and 3/4 cups [415ml, 600 gm, 21 oz] of jam or fruit preserves, whatever flavor you like (Note: I use my homemade fruit preserves, which have a low sugar content. I recommend you choose a good quality product, made with mostly fruit.)
Assembling and baking the crostata di marmellata:
1.Heat the oven to 375ºF [190ºC/gas mark 5].
2.Take the pasta frolla out of the fridge, unwrap it and cut away ¼ of the dough. Reserve this dough to make the lattice top of the crostata. Refrigerate this dough while you work on the tart base.
3.To help roll the crostata dough, keep the dough on top of the plastic wrap that you had it wrapped in. This can help rolling the dough and can also help when transferring the dough to your pan. You can also use parchment paper for this. However, you can also roll the dough directly on a work surface if you prefer.
4.Lightly dust the top of the dough and your work surface (if you’re rolling directly on a work surface) with flour. Keep some flour handy to dust the dough as you go along.
5.If the dough is very firm, start by pressing the dough with the rolling pin from the middle to each end, moving the rolling pin by a pin's width each time; turn the dough 180 degrees and repeat; when it softens, start rolling.
6.Roll the dough into a circle about 1/8th inch (3 mm) thick.
7.If you used the plastic wrap or parchment paper as rolling surface, flip dough over the pan, centering it, and delicately press it all around so the corners are well covered. Peel away the plastic wrap.
8.Trim the excess dough hanging over the edges of the pan. Press the remaining dough around the border into the sides of the pan making sure the border is an even thickness all the way around.
9.Prick the bottom of the dough with a fork in several places.
10.Take out of the fridge the reserved pasta frolla you had cut away earlier. Roll it with your pin and cut into strips or use cookie cutters to make small shapes (this is not traditional, but it looks cute); or roll with your hands into ropes.
11.Spread the jam or fruit preserves evenly over the bottom of the crostata.
12.Use the prepared strips or rolls of dough to make a lattice over the surface, or decorate with the cut shapes. (Note: You can use dough scraps to make cookies: see the Additional Information section for some pointers)
13.Brush the border and strips of dough with the reserved beaten eggs. You can add a drop or two of water to the beaten eggs if you don’t have enough liquid.
14.Put the tart in the oven and bake for 25 minutes.
15.After 25 minutes, check the tart and continue baking until the tart is of a nice golden hue. (Note: Every oven is different. In my oven it took 34 minutes to bake the tart until golden.)
16.When done, remove the tart from the oven and let cool. If you have used a tart pan with a removable bottom, then release the tart base from the fluted tart ring. Make sure the tart is completely cool before slicing and serving.